Q:
How to purchase IconCool Studio and how much should I pay?
A: We offer Safe, Sure and
Fast online order. With Secure Online Order you'll get the full version and
registration code in a few minutes! We strongly recommend that you use our
secure online, order facility. Our payment service providers: ShareIt, RegSoft,
RegNet, Kagi, RegNow and Paypal. Specified steps as follows:
Step 1 Visit our site www.iconcool.com
and open registration page.
Step 2 Click "Buy
Now" button and submit an online payment within the Shareit.com web page.
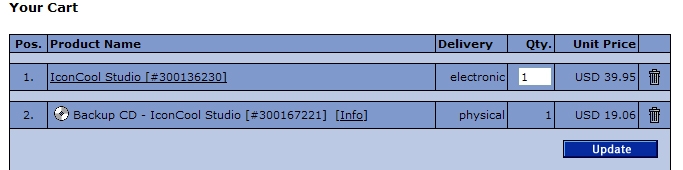
Note:
If you
don’t need Backup CD - IconCool Studio delivered by Share-it, please click

to remove, or you’ll have
to pay the Backup CD - IconCool Studio.
Q:
Whom should I contact while meeting any questions about IconCool Studio?
A: If you have any questions
about IconCool Studio or any suggestions, please feel free to contact us with
our
Feedback system.
Q:
Does IconCool Studio support Win7/8/Vista OS and create icons for Win7/8/Vista?
A: Yes.
Q:
How to create a 32-bit icon?
A: Step 1 Install IconCool Studio, and run it.
Step 2 Click File->New in
the menu column to pop up "Create New Icon Project" dialog box, type project
name, choose "256x256Pixels" from size listings,
choose "True Colors + Aplha"from color listings.
Step 3 Click "OK" to save and the project could be
viewed in Windows 7/8/Vista OS.
Q:
What is Photoshop Plug-in and how to use it in IconCool Studio?
A: Photoshop Plug-in of
IconCool Studio makes the mutual-sending currently editing image realize
between IconCool Studio and Adobe Photoshop. If you have not installed
Photoshop Plug-in in your native computer, please install first. Open menu,
click "File->Install Photoshop Plug-in"to pop up "Install Photoshop
Plug-in"dialog box and make sure the directory where you want to install, then
click "OK" to install. If the installation is successful there appears a
"IconCool->Transfer to IconCool Studio..." in the "Filter"menu in Adobe
Photoshop.
If you have successfully installed Photoshop Plug-in before, the
function of mutual-sending currently editing image between IconCool Studio and
Adobe Photoshop can be directly applied.
Note:
Only
after installed IconCool Studio and Adobe Photoshop, all the image
mutual-sending actions above can be successfully processed.
Q:
How to create an icon with different states?
A: The icon editing being
finished, click File->Save as to pop up a dialog box. Choose where to save
the icon and "Save with three states" from save type. The icon will be
automatically saved as three states: Grayscale, Current Pick, and
Lighter.
Q:
How to import an image to IconCool Studio?
A: Click File->Import,
choose the image you want to import and click "OK" to pop up a dialog box,
select the section you want to import with Marquee; if you want to select
standard size, please use Standard Selection tool to act. Then click "Next" to
finish. If you want to import the entire image, please directly click "Next" to
pop up format choosing dialog box and select the size and color you need, and
then click "OK" .
Q:
How to create and manage a new gradient?
A: Step 1 Click "Gradient"in
Color Mixer of the function panel.
Step 2
Click

to pop up "Add Gradient" dialog box, make sure the gradient style,
opacity, color and color proportion, then click
"Save"button. There will appear a new gradient in the gradient library. To
apply a gradient, click directly the gradient; to delete
a gradient, click

.
Q:
How to create an animated .ANI file by Ani Editor?
A: There are three methods to
create a .ANI file.
Method 1
Click

in toolbar to open ANI Editor.
Choose the frame you want from Frame Editing, then click

to import the image you want. Set the frame
stay-time and hot spot, click

to view the effect. Finally,
click "Save" button to save it as a .ANI file.
Method 2
Send directly the
image existing in editing area to Ani Editor.
Click Edit->Send Current
image to Ani Edtor, then to create a .ANI file Ani Edtor.
Method 3
Right
click the format of current image below the canvas to find "Send Current image
to Ani Edtor" and choose, then to create a .ANI file in Ani Edtor.
Q:How
to create a .CUR file?
A: While completing the icon
editing, to create a .CUR file, please click "Tools->Set Hot Spot for
Cursors" to pop up Set Hot Spot for Cursors dialog. Then set the position for
Hot Spot by choosing the values of "X"and "Y" click "Apply" button to view the
effect in the "Sample Controls" area by moving mouse. Click "Save" button to
save as a .CUR file.
Q:
Can IconCool Studio support filters like Photoshop and preview filter
effects?
A: Yes.
Q:
Is there a convenient project for icon editing in IconCool Studio for an
unskillful user?
A: Yes. IconCool Mixer is a
new tool built in IconCool Studio, it provides beginners with convenient and
powerful functions. It enables the creation of professional icons with ease.
IconCool Mixer provides you with an image layer mode to create and edit icons
that is similar to Adobe Photoshop.
Here are many elements created by our
designers, you are able to operate at ease base on these elements, including
size changes, rotation, movement, color changes, adding of gradients, and so on.
The more surprising are you can also add some effects we provided for these
elements, such as Outer shadow, Inner shadow, Stroke, Emboss, etc. You can save
the effects set for one design for the application of future designs.
There
are also many preset effects for you to choose from that will enable you to
create stunning icons in a matter of minutes. Meanwhile, you can also make a
transparent PNG in IconCool Studio or other graphics software and then import
them into IconCool Mixer as an element for use.
Q:
How to open and refine an .ICL file in IconCool Studio?
A: Step 1 Click File->Open
appears a dialog, choose the file you want to open and select .ICL from file
type, then open it. An ICL management window presents.
Step 2 Double-click
the icon in preview and open it in IconCool Studio.
Step 3 Click

to open another a .ICL file, click

to save it as a .ICL file.
Q:
How to open and refine an .EXE or a .DLL file in IconCool Studio?
A: Step 1 Click File->Open,
choose.EXE or .DLL from file type to open a file to appear ICL management
window.
Step 2 Double-click the icon in preview and open it in IconCool Studio.
Step 3 Click
to open another a .EXE or .DLL
file, click
to save it as a .ICL file.
Note:
If you
have many .ICL files to act, please
wait.
Q:
How to insert an icon to the current project?
When you want to insert an external icon to current editor area, click File menu->Insert an Icon.If the inserting icon has same format with current project, the Overwrite window will pop up, choose YES to replace current format icon, and No to quit.
Q:
How to view the icon real effect?
This function is an easy way to view your current edited icon before you want to finish your project. Click Tools menu->Icon Viewing or right click your mouse on one format icon in the icon format list. You can move this icon to any places you want put just by dragging mouse.